So we were unable to celebrate with the usual singing and dancing around the Maypole.
So for Moran's birthday she wanted to have a Maypole and we made this one from scratch.
Here is how we made it!
Materials:
* A pole of your choice, we cut down a tree from our block, but in the past we have used a very long piece of timber, a tall tomato stake (our first maypole was this as our children were all small then) or you could use a plastic pipe of some sort.
* A hole to put the pole in and a strong lad to dig it, or a lass if you prefer.
* Ribbon to length. Our pole length was 3 meters above ground with a half meter buried . So our ribbon was meters long, they could have been longer but this was more than adequate
The colour and how many depends on personal choice. Our Maypole has 10 ribbons of various colours, but 10 because that is how many children we have at home at the moment. You can add or take off the ribbons at will.
* metal U shape fence staples Here is an image link These are to tie the ribbon they can be taken off when not in use
* hammer, shovel and perhaps a sledge hammer
* flowers to decorate the top. We used silk ones as it is Autumn season here and not many flowers in our garden.
* participants
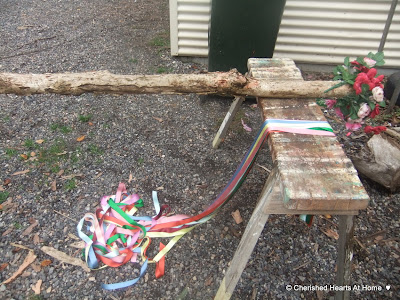
First off lay your pole across two 'ponies' as we call them, builders saw horses to steady the pole while you work on it. You may want to dig your hole now and check you have enough depth, for safety reasons, prior to completing your Maypole.
The next thing to do is to hammer in your U shape staples around the top of the pole about 10-15 cm from the top. You can measure accurately if you like but I just 'eye-balled them in'
Take your flowers and place them in and around the U shapes, with blossom part upward, holding them steady with one or two further down the pole if needed.
You can see from this view that the flowers are amongst the U shapes and yet still see the U shapes for tying on the ribbon.
Ribbon waiting to be tied on to the pole.
The ribbon is simply tied on with a knot that can be taken off as desired. You could add more than one colour from each U shape but we did not
All ready to be placed in the pre dug hole
I just love the way it looks with the flowers and ribbons on top.
Ready for our children to use
All about to start.
Ribbon wrapping around the pole
Children running and leaping and praising God. We really have never learned any of the complicated dances but simple skipping and running while singing this song~
Fairy Branch Song:
Here's a branch of snowy May!
A branch the Fairies gave me!
Who would like to dance today
With the branch the fairies gave me?
Dance away dance away
Holding high the branch of May!
Dance away dance away
Holding high the branch of May!
Here is a pattern to follow if you are more adventurous
I hope you have enjoyed this small tutorial on making a Maypole. Really a simple and sweet tradition to share with your own children or others as well.
For more ideas to celebrate Mayday and Maypoles look Here and a painting from last year by our talented Eden
 |
| Eden's Mayday Girl (original work) |


0 comments:
Post a Comment