Pages

Showing posts with label Creativity. Show all posts

Wednesday, October 10, 2012

Homemade Tree Blocks Tutorial

One of the last activities I wanted done was to make some 'tree blocks' for our children to play with.
We had done this several years ago for Corbyn's first birthday and now he is six, we some how managed to lose some of the blocks.
As we had access to lots of trees on our property I was keen to do this project again before we moved. In fact we did on our second last day of being in Tassie.
So how do you make tree blocks for children to play with at home like those lovely expensive ones you can buy? We made at least double this amount of blocks in various sizes. Although we did buy Rogan this tree house some years ago and they children play with both the tree blocks and tree house. However I do think they use the tree blocks more often than the tree house.
So back to the making of tree blocks.
First select some branches to use of various widths and lengths to use.

Then randomly,well that is our method, you can measure and mark if you want, cut the branches with a drop saw.
Of course you can use a hand saw but you don't get as even a cut or as smooth a finish in my opinion. If a handsaw is all you have (as we did for a few of ours initially the first time we attempted this)  then use what you have.
Please note:  Saxon did use safety glasses for the cutting with the drop saw but took them off for this posed photo!!
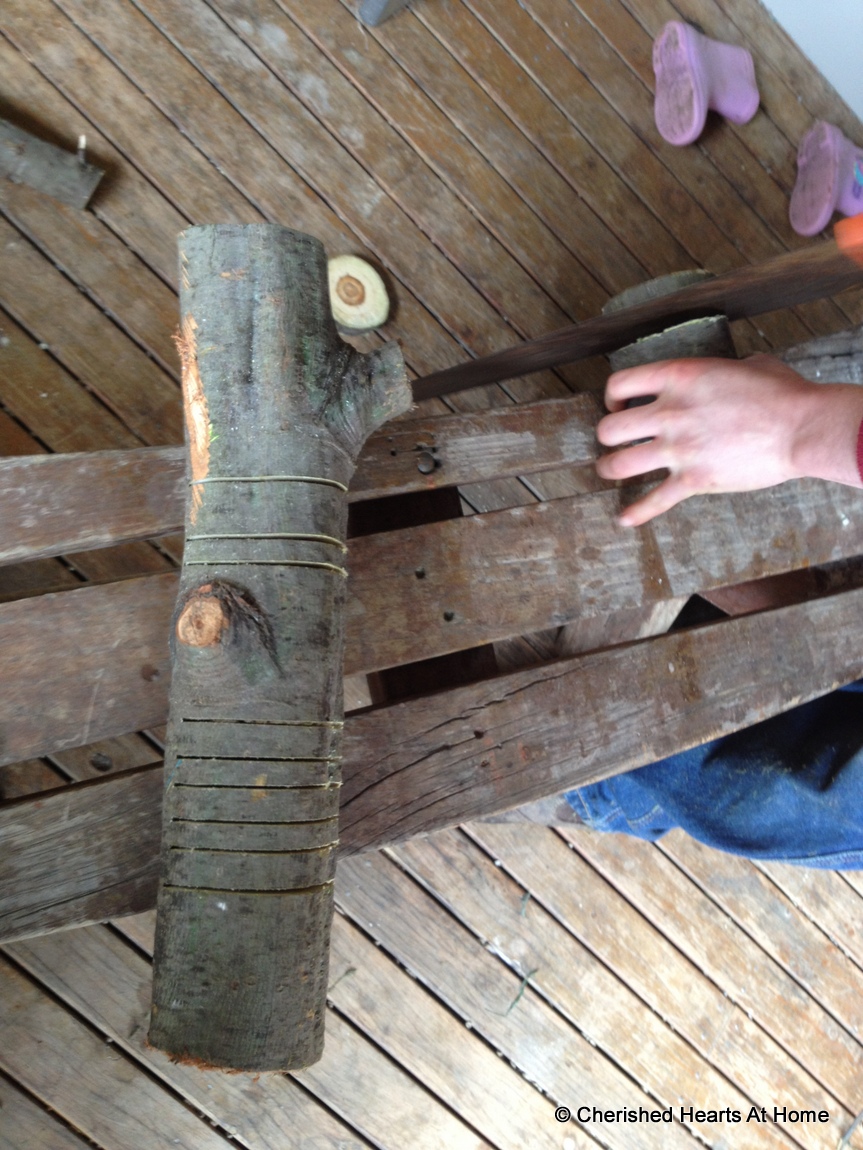
As some of our branches were thicker through we were only able to cut partially through and then we carefully lifted the saw up and moved it along. Then we completed the cut with the handsaw.
Here you can see the lengths we used on this piece of branch. The wood we used was wattle as we had already had to cut it down for the removalist truck to come up our driveway, but we have used gum and Tasmanian Blackwood before too.
It was most  satisfying to see our little stack of tree blocks drop to the verandah. This outdoor stool made a great saw horse as the saw could fit right through the gaps in the seat.
Yep those are the safety glasses and yes that is our most talented son.
Continue on with this process until you have a selection you are happy with. I like those ones with the branch coming off the end and the slight tear in the bark.
The next stage of course is sanding and polishing.

Dare I admit that we actually nave never done this as we love the rough look and the drop saw as I said does give a lovely finish anyway  But for anyone who is a purist you then sand and then polish with beeswax polish for a completed look.

Our children have had hours of play time with these blocks and you can often see them in my blog posts with the children's creativity.

In fact here is one from last night that Rogan made of various structures from Lord of the Rings:
I  hope you enjoy making your own tree blocks as much as we have!!

Blessings to you and your homes,
 

Friday, August 24, 2012

Four Nighties Finished.......at last!

They are done!!
The nighties that I had started way back when I started sewing these for Moran and Myffwyn.
I finished them about two weeks ago but have not had time to post them.
I also wanted to get a photo of the four girls together in them and they kept not wearing them at the same time.
So finally I remembered in the morning after they had been  sleeping in them, hence the slightly disheveled look.
Arwen's  are still a bit too long in the sleeves. I haven't mentioned here the fact that I actually put one of Arwen's arms on to Vellvin's nightie and did not know until I had completed it with a beautiful over locked edge too.
I had to undo it and do it again but by then I had already finished the other arm of Arwen's and could not adjust it, so I will be gathering the sleeve up soon. Until then she wears the sleeve rolled up and well there is growing room I guess.
Sweet gentle Vellvin loved hers and was so patient getting hers finished. It was her idea for a nightie for winter as she loves wearing them and her old one is a little small now.
She did want to have all younger girls to have them together but was content to wait for the other girls to have theirs first.
Myffwyn had hers finished quite a few weeks ago and has been wearing hers quite a lot with Moran
I just adore the red flannel look don't you?

So now our sewing project will be making some Spring and Summer clothing as we really do not have much as the weather in Tasmania does  not get that hot.
But I believer the weather in Wagga is already warming up compared to here so, yes, we will be hitting the sewing machines after we move quite quickly I think!

BTW I will be hosting  a giveaway next week as we leave Tassie so all you who love books and creativity be prepared to enter this first of a variety of giveaways I will be hosting.

Blessings to you and your homes,
 

Saturday, August 11, 2012

Our Homemade Paper Dolls - tutorial

Last week was the beginning of some changes in our home, at least for a short time while we are waiting to relocate.
With our dear Daddy away I really wanted to have a stricter routine of meals and clean up as well as bedtime routines for the children (and me) so I reverted to a policy that we have had before in our home of NO DVDs (which is our only TV viewing) during the week at all.

We have had this policy before and it gradually erodes as we start to watch a little here and there and then find we are watching it a little each day.

I admit that especially with Stephen away it can be a temptation for a ' five minutes piece' to send children to watch the TV.

However I do know that our children are far more creative in their play as well as what they do with their time when we eliminate or reduce the screen time.
In an effort to encourage this I decided it was time to get out the 'old tested and tried paper dolls' that we have had for over 12 years in a manila folder. These tend to come and go with the seasons and we have not had them out since last year.

When I got them out again though I was quite disappointed that my original templates had been lost, these were hand drawn by me years ago.
So before I could do anything with he children I had to hand draw them again so we could start to cut them out. This is the link to the actual document for the patterns

What do you need for this project?
I always use manila folders for the body of the doll
You also need some cardboard in various colours. You can use folder dividers or large coloured cardboard sheets.
Standard $1 wrapping paper from the cheap shop
coloured paper
Gel pens
crayons
Scissors
Glue
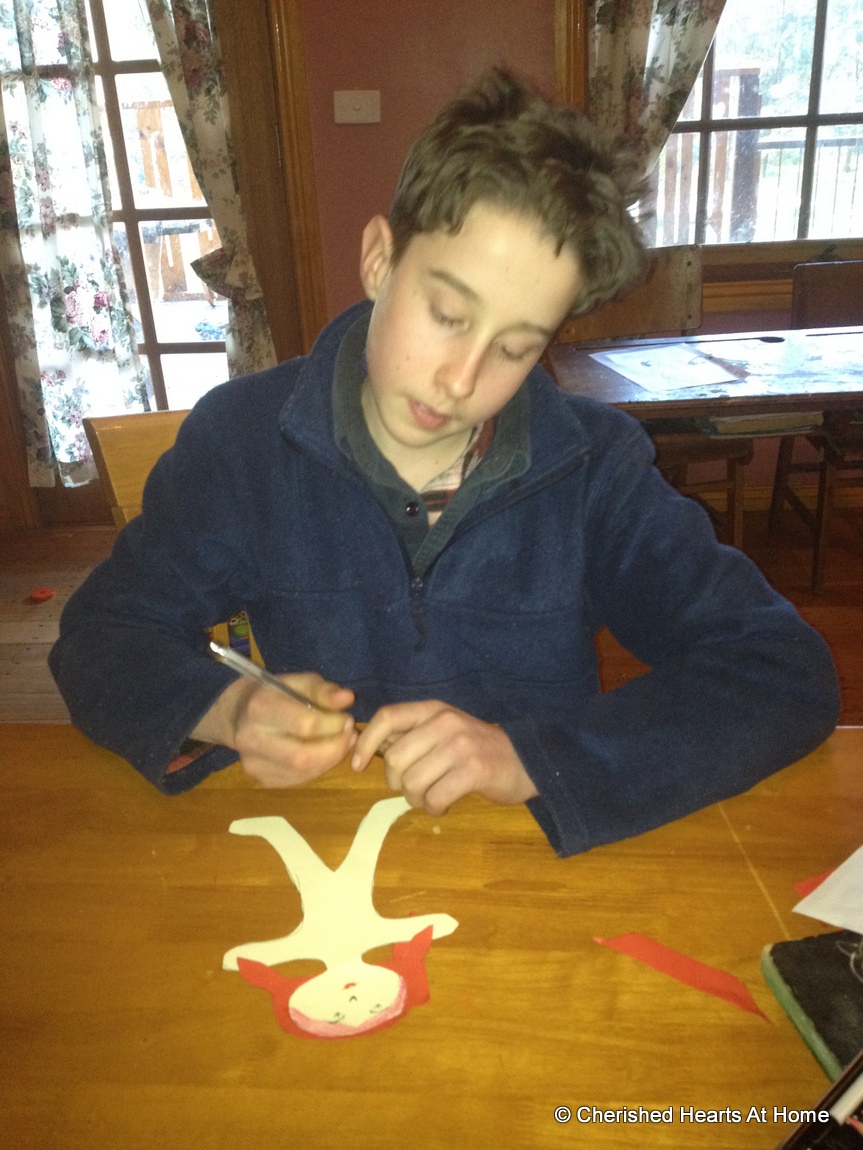
Then we started to trace and cut out the paper dolls.
It is best if you cut out all your pattern pieces first then you can then use the pieces for the coloured paper you want.
First you need to cut out the body and a hair pattern.
Then you glue the hair on to the back of the head
Give your doll a face with gel pens, our favourite and colour in the fringe with crayon or pencil, we used crayon.
Our dolls preferred to have some drawn on underwear for modesty, but you could and I have in the past given them paper underwear.
This is the best part according to Myffwyn. Choosing the dresses for the doll.
Measure the length of the dress you wan ton your doll form the shoulder an then double over using the folded part as your shoulder seam.
Then cut a small hole for the head to slip through..
Cut curves or other patterns for the dress as well as a waist line
The tricky part is getting the dress over the head. You actually need to slightly bend the head (vertically) without creasing it in half to slip the dress over it.
Then add your accessories to the doll  an you have completed your first doll  to play with.
Myffwyn was very patient as I made the first doll around a very tired little baby who refused to have a nap.
Rogan is one of our crafty children who loves to try new things and was very keen to get started on one too.
Myffy choose to draw her shoes on the doll and really had fun making this one.
Rogan was not happy with his first doll but will get the hang of it as we do more and more this week.

I hope you have enjoyed  this little arty, crafty tutorial. We are planning on having quite a few paper craft sessions over the next week.

Blessings to you and your homes,
 

Wednesday, July 18, 2012

My Latest Craft Project..........

Over the last few weeks in any spare time I could find, which isn't really very much,I have been working on this new "Birthday Presentation" for our family celebrations.
I had hoped to have it ready for Autumn's birthday but sadly that did not happen.

It actually started with me wanting to make a new item for our birthday table and grew from there.
The item I started was a Birthday Fairy and I was just going to add her to our birthday seasons table; but as I thought about it I really wanted to expand the idea some more.
So the next thing I thought was I wanted to make a 'birthday banner' similar to the idea we have on display for our birthdays. So I based our mini  version on the one had  I made that we put up each birthday, here is one post with a picture of it.
The next thing I made was some birthday balloons, however I have not attached them to the birthday fairy's hand yet!
Finally (well almost) I made some sculpy items for our fairy to use and a beautiful hand needle felted wool blanket for her to rest on.

Myffwyn insisted on helping me with this and I had some ideas on how I wanted it but she took over on the cake especially, so it could be considered her creation. I think she has a gift in this area like her sister Eden. Did you see the photo at the start of Eden's birthday post? She made these just for fun too.I really enjoyed making these with her and look forward to more creating with Myffy soon.

However Vellvin said our fairy was lonely and needs a friend like the fairy in the Shirley Barber books, and so next up will be a teddy friend for her to have a picnic with.

Perhaps this is going to be a project that grow and grow!
Does anyone else have those sort of projects too?

I am considering this as one of the projects to put in the Etsy shop we keep thinking of starting. What do you think?

I am hoping to write a tutorial on how I made these soon too

BTW, does anyone else keep having trouble with some of the text coming up with a white background, for no apparent reason lately in your blog posts?

Blessings to you and your homes,

Sunday, July 1, 2012

Wind Ribbons - a small tutorial for quick fun

It was one of those days!
A day when I was busy and things did not seem to be going right.
A day when I was not focused on our children even though I was right there with them. I was caught up in the 'to do ' things.

And then I simply thought we needed to go outside and play and walk together.

So simple! So easy! So wonderful!
Already I was refreshed and and looking for fun with our children.

It was a windy day and Myffwyn brought out a piece of wool on a stick and was running with it, enjoying the wind, savoring the joy to be held  and I was inspired to be part of it and asked if they wanted me to make Wind Ribbons for them all.
I just hoped I had some crepe paper to do this as I planned......
but alas I did not.

However we had some left over ribbon bunting from St Patrick's day years ago and so I used that and some sticky tape.
So I cut the ribbon to the length I wanted , sticky taped the top to hold it.
Then I placed sticky tape at a point further down to create a handle so to speak and then simply tore up the ribbon in long strips to create the 'swirly' parts. I guess the bunting  it is like that ribbon you wrap presents in that you curl up with scissors, I really don't know what it is actually called. I bought it at our local 'cheap store.'
Wind Ribbon all ready to play with, in less than two minutes.
See how it curls at the bottom.
And really we had a lot of fun for little cost and very little effort.
But, boy oh boy, was I thankful that I took this time to be with our little ones and share in the joy that they had together, outside in the wild and windy weather.

By the way, if you are interested, we all came back in much happier and hopeful souls!!

Blessings to you and your homes
,

Friday, June 15, 2012

Winter Seasons Table

We have finally started to have some Winter weather over the last few weeks and after Myffwyn's birthday which is on the first day of Winter for us, we changed our various Seasons displays to reflect this.

Our main season's table has some interesting snowmen and a wood elf perched up on the  grapevine wreath wrapped in winter coloured ribbons with some red winter berries on it.  Don't you just love that beautiful painted yellow moon up there with her?

As time goes by we will add some snowflakes and winter lights as well as a few other winter treats.
In the brick fire place we have Mother Earth with her little babies in a basket along with King Winter.
To keep them company we have Jack Frost along with Jill Frost and their adorable little frostlings. These have been dry needle felted  and are very soft and lovely.
On another book case we have the pipe cleaner tree I made bare of any colour - neither leaves or blossoms and it looks very bare indeed without any colour.

Behind that we have a home made carved wooden tree that is polished with bees wax along with some Winter elements on a half  circle display ring. These were made for me by our son a few years ago and painted by one of our girls for me. I especially love the pine tree that for me really speaks of Winter.

I am looking forward to creating more Winter memories with our younger children as we celebrate this most favoured season.

I am linking to Natural Suburbia for Creative Friday this week

Blessings to you and your homes,
 

Thursday, May 31, 2012

Needle and Thread - Flannel Nightie

I have wanted to join in Needle n Thread for many weeks now but just wasn't organised.
so this is my first attempt at sharing my recent sewing.

As winter approaches (actually the first day greats us in the morning here) our younger girls were in need of some new winter nightwear. Quite a few years ago, in fact when Autumn and Eden were 5 and 3 I made them winter plaid nighties, my first attempt at them.

However as it grew colder Vellvin kept saying to me 'Lets make the nighties and winter skirts for the little girls." So I sorted through my patterns and finally decided on this Simplicity 9942 that I have had in anticipation of making new nighties. I did not do the large ruffle around the bottom as it requires so much more fabric.
We had some red flannel left over from last year and so we began to cut and stitch.
While I was sewing this on for Moran and another for Myffwyn, which I am nearly finished Vellvin was making some cord winter skirts for the three younger girls.
We actually did not have enough red flannel for Vellvin and Arwen as well and so we purchased some pink with a pattern on it for them. This will be my next task to make them!
As for reading I have been reading a lot of books on my Kindle. The latest is a going back in time  Daughter of Time  (first in a series) by Sarah Woodbury. This one is going back to Wales in the thirteenth century.

This has been a real  eye opener and I recommend it for anyone who has had a child with one of these labels or even 'Developmental Delay.'
It talks about retraining the brain to overcome these issues and gives the exercises to do this at home. 
From my research it is very similar if not identical to the Arrowsmith School practices which I cannot find any 'at home programme' for.

Well I will be off to check out the other great sewing and reading links at Elizabeth's blog this week. Hope to see you there.

Blessings to you and your homes,
 
Related Posts Plugin for WordPress, Blogger...